Plain-English summary#
A Purchase Order (PO) is the formal record of what you ordered from which supplier, at what price. POs move through a status pipeline you can configure. By default: Draft → Pending Approval → Approved → Sent to Supplier → Partially Billed → Billed → Closed, with Cancelled as the way out. Only the moves set up in the pipeline are allowed.
Receiving goods and billing are separate documents that follow the PO. From a PO you "Receive items" (creating a Purchase Receive that adds stock to a location) and "Create Bill" (creating what you owe). A PO is never deleted — you cancel it by changing its status.
When you'd use this#
- Placing a weekly produce order with a supplier
- Keeping track of open POs to chase late deliveries (delivery date + assigned person)
- Receiving goods into stock against what you ordered
- Turning a PO into a supplier bill for payment
- Matching supplier invoices against goods received
How to access#
- Purchase Orders: in admin.foodops.io, Expenses → Purchase Orders (list, New, details, edit).
- Receives: Expenses → Purchase Receipts, or Receive items from a PO.
Walkthrough#
Creating a PO#
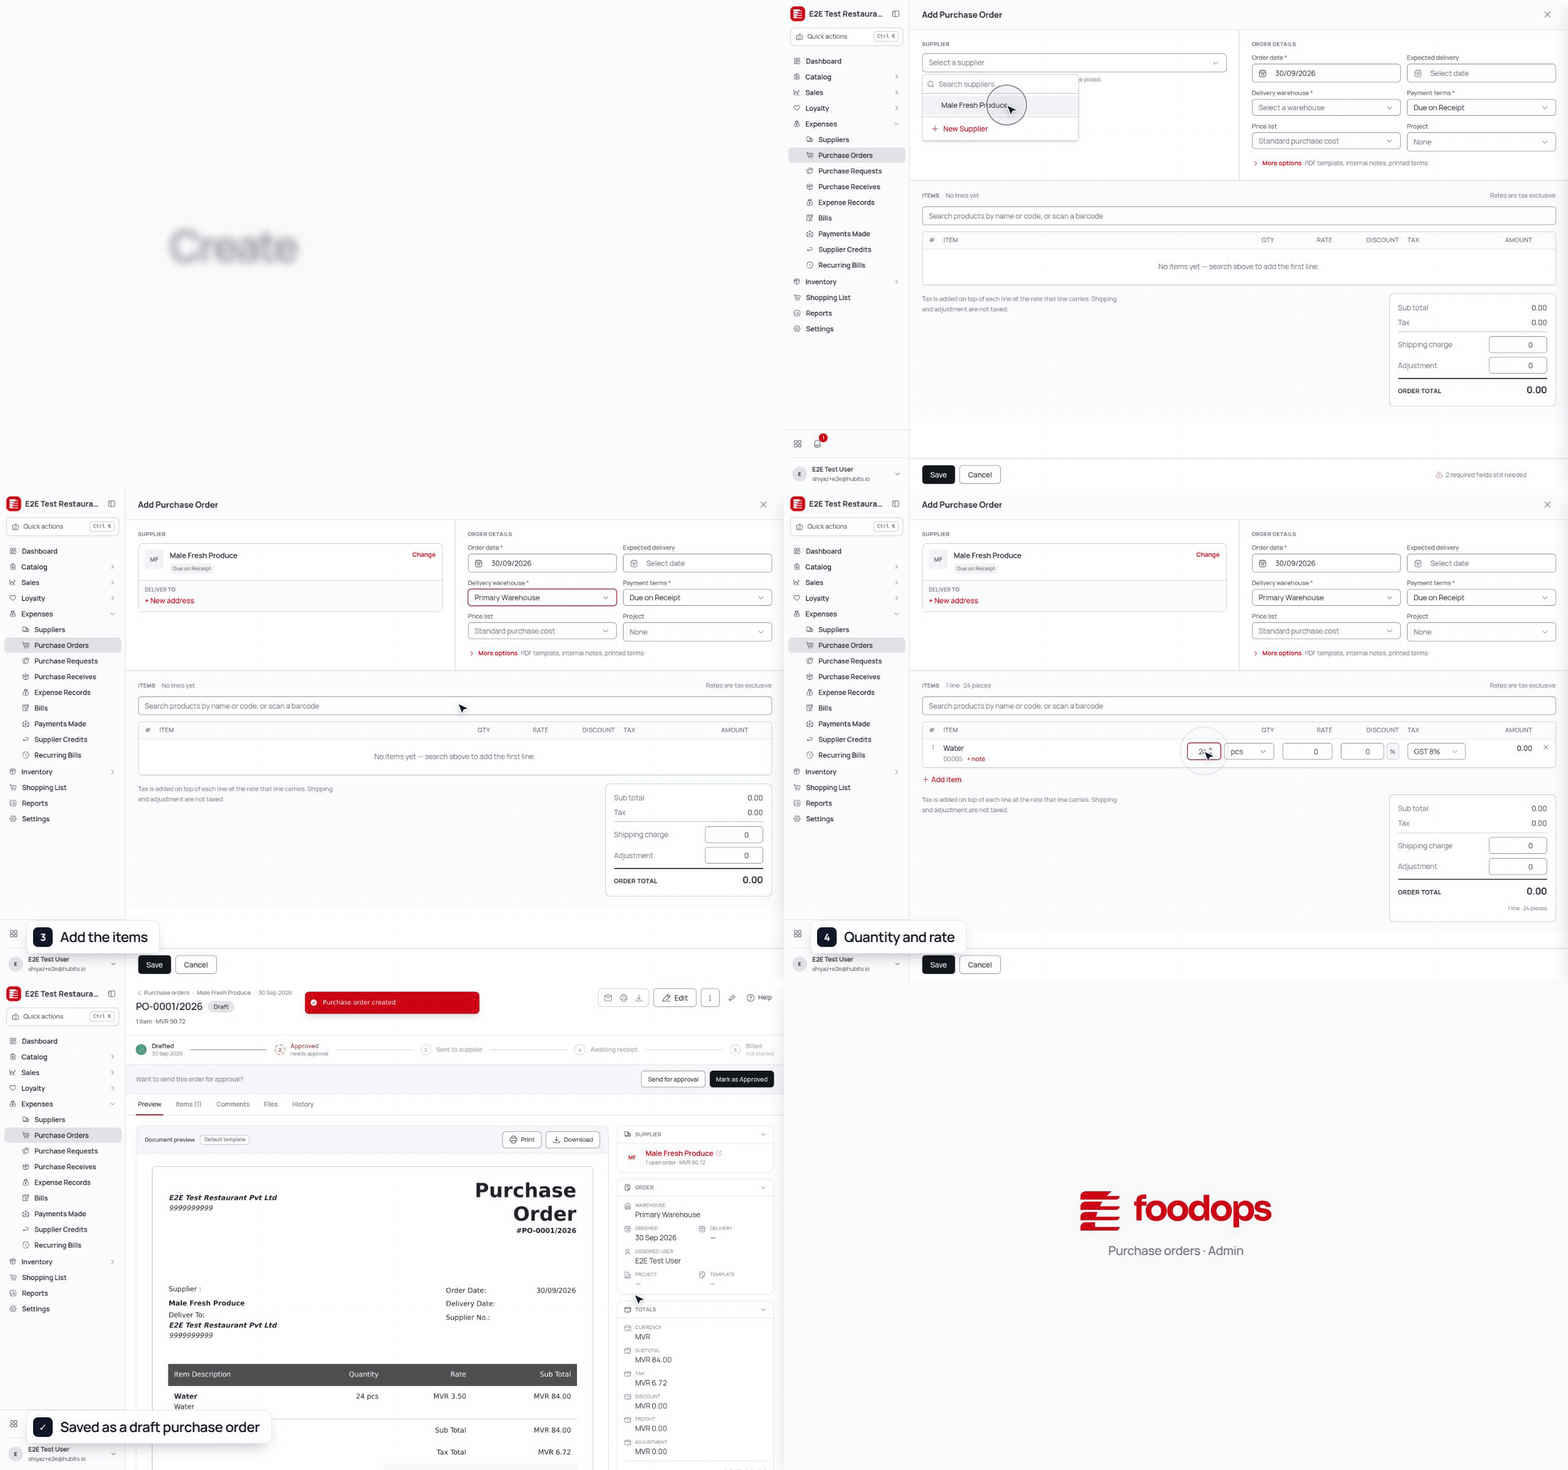
- Expenses → Purchase Orders → New. Select the supplier, add line items (product variant + quantity + price) and check the totals.
- Submit. You need permission to create purchase orders. Foodops fills in anything the form doesn't ask for: currency (the supplier's default, otherwise MVR), a default tax type, and the payment term (your organisation's default, otherwise the shortest active one).
- The new PO starts in its pipeline's first status (default: Draft).
Approving and sending#
- On a Draft PO, the preview tab shows an approval banner with Mark as Approved (when the pipeline needs approval).
- The status dropdown only offers the statuses you can move to from the current one. Any other move is refused with "Transition from 'X' to 'Y' is not allowed."
- From the PO you can email it to the supplier, print it, and switch its print template.
Receiving goods (separate document)#
- From the PO details header menu, choose Receive items. (It's disabled when the PO is cancelled, or once every line on the order has been fully received.)
- Pick the location (required) and enter the quantities actually received for each line (these can differ from what you ordered). Saving creates a Purchase Receive, which adds the stock to that location.
- Each PO line keeps track of the quantity received, and the PO details list its receives with their statuses. Receiving is allowed in certain statuses (default pipeline: Sent to Supplier, Partially Billed, Billed).
Billing and closing#
- Create Bill from the PO details opens a new bill already linked to the PO. Billing moves the PO to Partially Billed / Billed.
- Closed is the default pipeline's final completed status. Cancelled is reached through the Cancel dialog (a status change, not a deletion).
Working together on a PO#
- Assign a person to the PO and set or change the expected delivery date.
- Add, edit and delete comments, and upload, download and remove file attachments on the PO. The activity log and history give you an audit trail.
- You can export and import POs in bulk.
Key concepts#
- Status pipeline — each PO follows a pipeline of statuses with set moves between them. The default is Draft → Pending Approval → Approved → Sent to Supplier → Partially Billed → Billed → Closed (+ Cancelled). Pipelines can be configured, so your organisation's statuses may differ.
- Statuses control what you can do — each status decides whether receiving is allowed, whether billing is allowed, whether approval is needed (the approval banner), and whether it's a final, completed or cancelled status.
- Receive ≠ close — receiving creates a Purchase Receive and adds stock, but doesn't close the PO. Receives are their own documents, with their own list page, statuses, comments and files.
- No deleting — cancel by changing the status. Comments can be edited or deleted and files removed, but the PO itself stays.
- Defaults filled in for you — currency, tax type and payment term are filled in automatically so the form stays short.
- Warehouse → stock location — the warehouse you pick on the receive form decides where the stock is added.
Common questions#
Q: What statuses can a PO be in? A: Whatever its pipeline defines. Default: Draft, Pending Approval, Approved, Sent to Supplier, Partially Billed, Billed, Closed, Cancelled. The status dropdown only offers moves allowed from the current status.
Q: Why can't I move my PO straight from Draft to Billed? A: The pipeline only allows set moves — "Transition from 'Draft' to 'Billed' is not allowed" means there's no direct step. Go through the statuses in order.
Q: How do I receive a partial delivery? A: Receive items → enter the quantities actually received. Each receive is its own document; received quantities add up on the PO lines, and you can receive the rest later.
Q: Does receiving update my stock? A: Yes — saving the receive adds the stock to the selected location. That's when inventory changes, not when the PO is created.
Q: How do I turn the PO into something I pay? A: Create Bill from the PO details — the bill is what you owe, and payment is recorded against the bill (see Suppliers & Purchase Orders for payments).